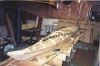
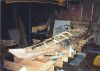
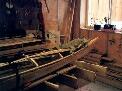
 The second thing I did was starting to play with putting a test
feature strip pattern on the hull. Here is a picture of what I was
thinking and what I more or less did. I spent about 3/4 of an hour
mucking around with this test pattern.
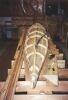
The second thing I did was starting to play with putting a test
feature strip pattern on the hull. Here is a picture of what I was
thinking and what I more or less did. I spent about 3/4 of an hour
mucking around with this test pattern.
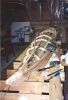
Last sunday spans two sections, I finishedthe machining ofmy strips. I also actually began to put strips onthe boat. I got Two strips on, one along the shearline on each side of the boat. These are simply stpaed to the stations to hole them in place. (Note: I'd do this more securly next time, perhaps with hot gun glue, or screws) The Idea is that these would act as a 'secured' end point, they are twisted into position so that they will mate will with the hull.
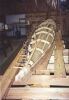
The second thing I did was starting to play with putting a test
feature strip pattern on the hull. Here is a picture of what I was
thinking and what I more or less did. I spent about 3/4 of an hour
mucking around with this test pattern.
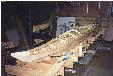
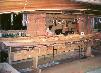
Finished the curves strips on the front of the deck. I'm unsure what I
want to do on the rear deck for a stripping pattern. Anyways below are
some pictures of the feature strips.
started filling the top and down in the front sectoin of the front of the
deck. oh look some pictures

Notice the horribly cut piece on the top section
The clamping method (it did not work to well more about that later). No that huge amount of clamps is not to hold the worlds most stubborn pice of 1/4 cedar strip in place. (well it is) but the clamps are just weight pushing down on the feature strip to hold it in tight to the strip below. There are better ways to do this. Still wondering about what to do with the rear deck.
Well due to the incoonsitancies on the strips I ripped for the left front section, I will not use three of the strips there. This leaves me short strips. I have scared togheter the ends of the cuttings to get enoguth strips to fill in the rest of the section. It is still going to be close.
tip:(obvious one) when you scarf the strip remember to wipe the glue out of the cove before it is dry. I used a piece of cutting that had the bead on it and was cut at a fairly low angle.
Thursday 1/4 hr - 1 strip
While filling the final pice onthe front section, thes time I got a bit smart and pre beveled the snd last piece. This made it MUCH easier to thet thelast piece in. I knew I should have done this earlier from reading Canoe Craft, Kayak Craft, and Nick Shades' kayak book, however I just forgot the first section. I doubt I'll do that again.
This time when starting the long section along the sheer line, I pre scarf joined the pieces. (last time I scarfed in place on the kayak) This make the strip go on much easier. Although I did not make it long enought to fit the entire distand, and I will scarf in place the end strip to get the entire run in. In pre scarfing I scarfed along the width of the strip this time.
( I will be having a fair bit to say on scarfing later, giving my opinion on which to use and when <todo: do this>)
Today just one strip, however I also decided to reduce the height on the "100 inch" station. I did this by making a new one. I wanted to have the rear deck a bit lower, and the locations that I choose for the stations make the deck come out a bit unfair along the top. I droped it a whopping 3/8 of an inch or so.
Looking back at the completed front section. I can see that it
is out of fair, a bulge down near the sheer line, and it is concave where
it should be convex up higher near the peak of the deck. The bulge
is due to the rounding work I did on the stations, the concave area is
wrong and how I fixed it Well stripping continues... I seem to be having problems with the
strip lengths again. It seems to be more pronounced as I go around
the twists in the deck.
One thing I found is that, my crummy F-clamp which broke
turned out to be a good thing. Love it when that happens. the
'top of the F' broke off, such that it fell off the bar. Turns out
the allows me to slide the bar through small holes, reach under put the
top back on, and use the clamp. The take the top off, and remove the
clamp. This helped me clamp, and align areas that I could not have
gotten a clamp on otherwise. Some times you just get lucky, and don't
even know it at the time..
I did not spend much time this weekend on the yak, I ended up
skiing on Saturday - It sure is nice to get out of the basementi
once in a while. It was a satisfying 4 hours though, I finished
stripping the right side along the shear line, as well as
the front right section.
I ended up with a bad fit on the last piece of the
front section (I made two attemps at it), and had to
fill in the cracks with shims, these were maybe 1/32 (around .03cm).
Supprisingly it looks pretty good, it helps that I have uniform
colored strips. but I am happy with the result. more so than
I expected.
Ramble on: Well Ive finished my 1st 4 sections now.
I've come to the conclusion It is Better to buld long pices of strips
rather than trying to scarf in place. (That may change once I try it).
I'll discuss what I thing are th epros and cons in the section on
scarffing
I've decided to go with a striped pattern for the next section.
This will reduce the effects of my feature strips, but will
allow me to complete the Deck wth the strip I have cut, I hope.
The pattern shold help draw th eye forwared on the deck. Yes, that
will bring it right to the lopsided center line... oh well.
Anyways, the next few evenings will be scarfing strips
together and thinking on how to finish up the rear deck patt
Well as promised I scarffed my longer strips. enough to
put 6 strips parallel to the feature strips on each side of the
kayak.
I've sort of decided what to do with the rear deck. I'm
going to have a V come back towards the cockpit, with a 2 inch
thick line. The outside of the line is a double feature strip
dark and light. I'd like to make the feature strips like
thouse on the front deck, but that is the last of my 1/4 x 1/4
dark strips. I had to scarf scraps together to get them.
(I'm might be good at scarfing by the end of this project). I
did magage to get the two dark pieces on, and am going to
butt the side strips into the line. put in the first upper side strip on the left side of the
kayak. This one had to be beveled the length of the strip, so
I expect the rest of them to go faster. These side strips are
around 12 ft long, So it should go much faster than the front
deck section. I did have a bit of a problem, I could not
bend the first side strip enough right below the cockpit. The
curve is a little to tight where the side and top feature
strips join. Out came a scrap sliver to fill in the gap again.
Another bit of greif occured here. At the rear of the
kayak, the deck had pulled off the stations, so the curve
running top to bottom is more than the stations. I attempted
to force the deck back onto the statiosn at the shear line, as
well as at the point. There was a resounding CRACK!! not a
happy sound I assure you. the rear deck split for about 2 ft.
(insert favorite swear word here). I'll fix that later.
Once the first stip was on and dried for a couple of hours,
I started placing the second stip to measure the end cuts,
Again I again had a bit of bad luck.
My scarf joint landed right in that tight curve area. Bending the
strip down, once again I got to hear CRACK!!, Ugh, my scarf
joint failed. Off came the strip. I recut a scarf on the one
peice, but this time I did it from front to back, rather than
top to bottom. I glued the scarf in place on the form.
Well it worked, sorta okay.
I got one more strip on today, nice and easy, no horrible
crack sounds.
Well I hurried home from work today, I posted some pics onthe
net, and one of the kayak builders noted that it looked like
my kayak was out of alignment. by a couple of inches. Yikes!! I
suspectd it was because the picture was off centered, but I was
worried. Turns out the alignment is off by about 3/4 of an inch.
I'll live with that. It maybe a result of putting the strips on
the deck. but I think most of the twist was already there.
I chiseled the from poriton along the center line, so I can
butt in the right side. I have 4 strips on the left side,
I did machine enough for 6 strips per side, but am wondreing if
4 would look better.
I decided to put the first strip on the other side of the boat
so I could see what it looked like once I had 4 strips per side
on. Oh my poor ears.... once again my scarf joint failed. I
switched to a water resistant glue, I wonder if it is more brittle
than my normal carpenters glue. (both the same brand). hmm.
Well looks like the fates want me to put 6 strips per side,
while I was waiting for my re-glue of the scarf to dry I got
another strip on the left side of the kayak
Well I've got 4 of the six side strips on the right side
of the kayak. The first on is a bit of a bear, running a
rolling bevel on it. So far so good on this side. Took three
pics with the 4th strip clamped in place. Finished the last strip on the side right side section.
I spent some time filling the small cracks due to the
bad fitting strips. Most of these are on the front left secton
where I was getting used to the cutting to fit issue, where
the ends of the strips but in to the bevel on the feature strip.
I did get better as time goes on at getting them to fit propperly.
Also, I spent a bit of time filling in some staple holes
on the front of the kayak. I used only a few staples, and the
holes are in the lightest strips. I think it was worth the
1/2 hour effort of so. The way I filled them was buy cutting
short 'toothpic' like slivers, dabing them in glue, shoving
into to the staple hole, and trimming flush with my knife.
I've decided to do the final triangle section on the front
using Nick Shades prefered stripping pattern. I do not have
enough wood
to setup a nice fetarure strip type edge around the triangle
Oh well. I suspect I'll like it well enough.
Unfortuantely I've discovered an other item I do not like
about my kayak.... I've managed to really twist one side at
the end of the rear deck. It looks like I'll have quite the
bulge at the the back. I do not see much I can do about
it without really taking a saw to the deck. Somthing I've decided
I'm unwiling to do. (turns out I change my mind later, to good
effect)
I ended up putting another strip on each side. Although
the cockpit recess should cut through it. I sure does make
for a wide band olong the side. If I was to do this again
I'd either go for a smaller band. or one of a more consitent
colour match. More edging or feature strips between the
areas would make it better as well. but hey this is my
practice kayak. As long as I go out and have fun it it I'll
be happy.
Today spent time stripping the from section of the deck
The center line is off center, this is because I did one side
then whne butting in the second side I pushed the first one down.
Which of course pushed it over a bit.
finished the front section of the deck
note: with the rear pattern on the top of the deck. I
would recommend not using bead and cove. Just go with a
slight bevel, if required (or possible go with the cove
up technique) . There top of the deck is almost
flat on each side of the centre line, so this should work.
I found that I ended up having to put a long cove in by
hand. This is due to the low angle at the apex of the V
in my pattern.
Finished the V in the centre of my deck, still have to
finish the two stripes, and close one sliver on the edge of
the stripe.
Well today I decided I better fix that bulge in the rear
deck before I fill in the stripe, that would have to twist up
to the bulge on one side. To do this I cut into the deck with
a utility knife, by re scoring over the line along my feature
strip. I then tried to carve out a porper bevel angle, and
re- glue. I did this along two seperate lines. The results are
notperfect, there are wounds now, but not to bad, and the
bulge is still there, but now it is just a character mark.
I also took one of my Cedar 2x2s, and ripped dow so I can fill the
rear stripse with one wide strip, the glue is drying on the
scarf joints now.
Put in the wide strips... this worked so much faster, and
better than trying tofill in small strips perpendicular to the
stripe. I was going to use the last of my scrap todo this, I'd
likely still be doing well into spring. I took a few pics below
with the strip taped down so the glue can dry. This finishes off
the last trip on the rear deck... yay.
Well having finished the deck, next time I'll definately do the
stripping differently next time. The way I did it this time
I put down the feature strips, then ran my other strips into them.
this caused me to spend alot of time fussing with cuts. I had to
'exact fit' both wide stripes... time consuming. it also forced
me to have to use tape to hold the deck in place, less than Ideal.
the stripe ended up sinking down, now it is almost 3/32nds low,
that will work, just could easily have been prevented. Also the
errors in the 'exact' fit could be avoided using a slightly different
stripping aproach.
So what would I do:
This would be easy to do, both for speed and for better fitting
strips. The strips could be fit better both gaps between the
strips, and for the alignment in the vertical direction, that is
to prevent one strip shifting and rising above the other.
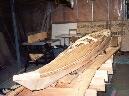
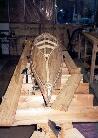
Anyways here are the pictures of my kayak
Wednesday through Satureday (6th to 8th) 6 hrs
Friday to Monday Feb 15th to 18th - 4hrs
Thurs & Fri aprox Feb 22nd. 6hrs
Sat, Feb23? - 4hrs
Monday 1 hrs
Tuesday 2 hrs
Wednesday 1.5hrs
Sat & Sun March 2, 5hrs
Friday, March 8, 5hrs


Sat, Sun, Mon- March 9, 10, and 11 - total 7.5hrs
Sat, Sun, March 16 & 17 - total 9 hrs
Tues, Wed, Fri - March 19, 21, 22 - total 4 1/4 hrs
Sat, March 23 - 2hrs
Sun, March 24 - 2hrs


