Summary: I'm working the combing lip at the same time I am building the hatches. So the dates are a bit mixed up. The process for the combing lip is strait out of Nick Schades' book. "the strip built sea kayak".
Earlier I had to buy some more ash to use for the combing lip. I bought a thin piece (3/16ths thick or so) about 6 inches by 3 or 4 ft. This cost me about $6.
I did not do much today for the combing lip. I spent 1/2 an hour ripping strips for the combing lip. I also used my bench sander to cut the angles at the end for the scarf joints. The strips are not quite long enough. I also ripped a bit of scrap cherry I had to put a bit of an accent line through the combing lip.
While building up the deck for extra support around the hatches, I glued the scarf joints for the wood on the combing lip.
Came downstairs to steam bend my combing lip. I got set up, but ended up breaking my cherry strip before I could steam bend it. So I cut another scarf and glued it (with wood glue, which later broke again when I steamed it (of course, it's not water proof)).
This broke when I was running the strips around the combing lip, not bending them, just getting a feel for the length. I did cut them, leaving a few inches extra.
I also tried to hot melt glue some spacers for the combing lip up, these were 1/2 inch thick pices of wood raised about 1/4 inch to give me a even spacing under the lip.
I tried dry bending a single ash strip, it did not want to make the bend. So I decided I'll be steaming them, and pre bending the wood.
the little spacers I had all fell off, a minor frustration, makinig it harder to get the combing lip in place. However this is just to bend the strips into a close enough shape so it is not a major consern. Better to learn this now, than when they are coated in epoxy.
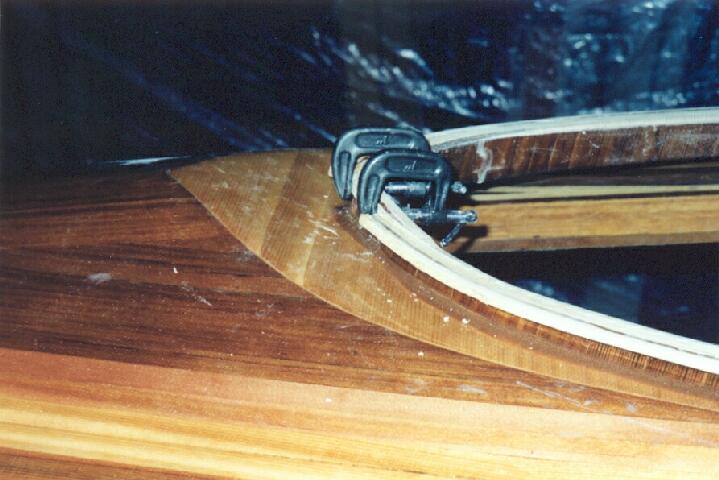
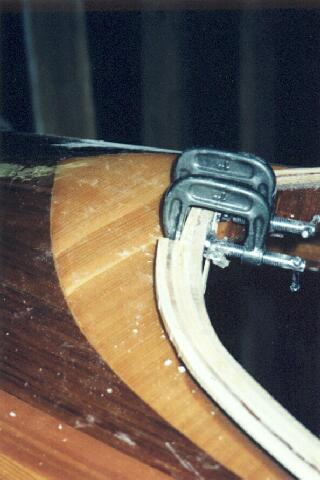
Getting the Stack of strips in place was a bit of a chore, even with Carol helping. One trick was to use a clamp put in place to hold the stack by feeding it through the gap in the U portion.
However what was really frustrating is my combing lip pieces is an inch to short. I thought I left lots extra, but the outer pieces are longer than I expected given the extra radius they span. I was not sure how I was going to try and clamp all this into place anyways. I'll just have to fill the gap in later.
I cut more spacers from some 3/4 inch thick scrap I had around. I had to cut one corner off so the fillet around the combing lip would not interfear. Then I hot melt glued them in place with a bead on the deck and on the combing riser. After this I sanded the combing lip so the epoxy would hold well (should have done this before I hot melt glued the spacers on, as they were in the way a bit.
I pre-coated the strips with epoxy both side, and waited 15 minutes for and of the epoxy to suck in to the wood leaving a starved spot. Thin I put on a bit more epoxy, this time thickened with some fairing compound. (fairing ' compound was used as it matches the colour of the ash well enough for me) Finally I clamped the combing lip in place.
The clamping inplace went well enough, although I should have made a better effort to get the strips in the stack to line up well. I'll pay for that later when I have to sand the top edge down.
TODO: fill this in with some detail. they are short steps, but some notes could be added...
I was going to work on the hatches today, but after 30 minutes or so I abandoned that and ended up working the combing lip again.
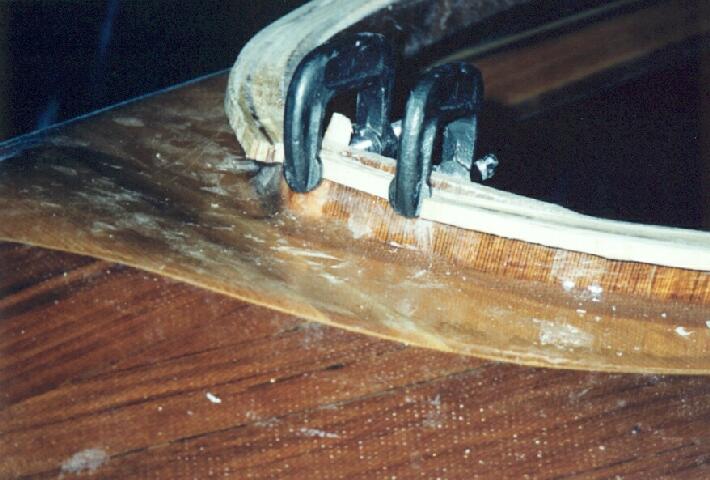
I Epoxy, and clamp the first piece to start the filling of the combing lip in place. After this I spent about 1 hour working the combing lip with a wood rasp and 100 grit sand paper. Because my strips on the combing lip were not lined up as well as they could. I have to take off a bit more material than I would like to get a nice smooth finish on the top. The lip still feels very strong, it is just about 3/16ths of an inch thick now. ( I may fiberglass it for extra strenght). It does look pretty good though.
I unclamped the little piece I had put in yesterday. I've got a bit of a problem. The piece had a pretty hard bend right at the end for about 1 cm or so. Later that day I notice it had come up off the combing lip.
Either it did not setup last night as it was to cold, or my mixing ratios are not good enough. Well I cut a bit of this strip off and will have to fill that section in with an even shorter piece. The epoxy does come off easier than I would expect with a chisel. it seems to soft... the combing lip does feel very solid. I'm going to leave it.
Well earlier I unclamped the first fill strip in the combing lip gap - it came unglued. I cut 1/4 of this piece out. Today I cut and fit a piece back in as well as puting the second piece in. the Bench sander works well for getting the piece just right.
One quick tip, I bought some LePage 5 minute Epoxy. This works well for two reasons: 1 it sets up alot faster than the West Epoxy I normally use, and two, it allows me to easily mix up small batches of epoxy. Added Jan 2005: Do not use this product on your kayak, The strips put on with this peeled off after a year of use. It did not hold well at all. I easily removed the remaining layers, and had to re-glue with proper 2 part marine epoxy.
It only took me 45 minutes to get three more of the filler strips in place. I had to shave the last light colourd one a bit to ensure the next strip (dark) will align properly.
Now that the dark strip is in place, it to needs to be shaved down to ensure the next piece will align properly. This is done in place with a chisel. It takes 30 minutes to get the last two pieces in an fill the gap. (took a picture)
Also spent 20 minutes or so to sand off the combing lip.