Summary: This section goes over the preparing the hull for glassing, then glassing it. This Should be a lot easier than the deck as it is ply wood, thus inside and out are combined in to one file.
Did I mention earlier that putting the tape on the hull to keep the deck from sticking to it during the stripping process? Well today I spent 2 hours trying to scrub off the tap residue. I ended up using vinegar, which kind of worked, although water may have been just as good. Spent two hours on it the first go. Later I came down for another 30 minutes to catch the spots that I missed, and started sanding with 100 grit sanding paper.
Note: About a week after I scrubbed all the tape residue off, some one posted a tip on the net about using an eraser to get gunk off.
Finished sanding the hull with 150 grit sandpaper.
After that I was more or less ready fiberglass the outside of the hull, however, it needs to be widened. So I glued in short pieces of wood around the edge of the inside shear line. I then pushed it out with sticks cut to size, so the shear would match the hull in width. This causes the rocker to really increase. It seems to me that it would be a lot easier to join the hulls this way. The second thing it did was make the hull panels twist and be a bit concave, I wonder what that will do.
Put the last few brace pieces in to widen the hull to 23 inches or so. (TODO: add picture)
Well, time to flip over the hull and epoxy the bottom. 10 minutes to wet out the grain. After the wood dried, I spent 1hr with the ROS and 150 grit sand paper. finally to clean it up I took the vacuum to the hull, and then finally a wipe with a dry rag.
It took 3 hours to layout the first layer of fiberglass, and apply the first coating of epoxy. The second layer of epoxy, took 2.5hrs, however I put on a fair bit more fiberglass over then ends for rub protection, Once again, the epoxy on one side was still a wee bit tacky, and smoothing it out was a bit of a strain. As a last second decision on the second coat I put up a thin piece of scrap fiberglass right on the keel line at both ends of the kayak.
The final coat of epoxy at 4:30am took an hour. It's purpose was to get a second good coating on the secondly of epoxy. Prior to putting it on, I did some work with a scraper to smooth the edge of the fiberglass so it would not be so ragged. After this dried It became apparent that I should have put a bit more time in with the scraper, but it's on the bottom.
At the time I was pushing out the beam, I was thinking that worst case is I'd have to trim the hull to get a good fit. As I write this, I've already glassed the out side of the hull and with just one side glassed, it is really easy to push the hull and deck together... we will see when I've done both.
Time to begin on the work on the inside of the hull. Today I'm cleaning up drips of glue and epoxy that has fallen onto the hull of the wood. That and cleaning up the mess I made of the fillets. That involves using a chisel to remove the offending material. Pretty much got it all except cleaning up the fillet along the keel line. Yes I should have cleaned up the epoxy on the fillets better when it was soft.
Spent around 15 minutes cleaning the mess around the fillet, running down the keel line with a chisel.
After this I spend about 1 hour cleaning the tape residue off the the inside of the shear line. Finished the first pass on both sides of the kayak
Spent 1/2 an hour today with the 100 grit sand paper, and my ROS. At this stage I think I'll regret not taking out the wires in the fillets. My fillets are quite small, and the wires protrude, making pronounce ridge in places. I suspect this will result in air bubbles near many of the wires.
Laid out the fiberglass on the inside of the hull. Once again I was able to scrap it in. Although there is one small triangle near the front shear that is not covered. I'll patch this with a small piece of fiber glass when I get there with the epoxy.
So with the fiberglass sitting in place waiting for the epoxy, I'm wondering if the I should have run some fiberglass tape along the fillets. Tomorrow at work I'll post a question to the board.
Well Pete posted that he figured my layup would be 'bomb proof' with the fiberglass tape, and the full layer. I'm not sure exactly what that means. That is should I put it on or not? I decide not the glass is already smoothed out, and it really should be good enough. So on goes the epoxy. It took me two hours to get the first coat on. The second coat usually goes a lot faster, but this took me an hour. It would have been faster but I put in more layer fiberglass in the bottom of the cockpit area.
Once again I tried to put this second layer of fiberglass in
place while the epoxy was still a bit tacky. If you start with the
fiberglass folded in half and push it into place from the fold to
on edge using your hand as a roller. It will go on fairly smooth.
I would not do this on a visible area of the kayak, but inside the
bottom of the cockpit it seemed reasonable. I was able to remove
all the wrinkles, but at the expense of stretching out the weave
of the fiberglass areas.
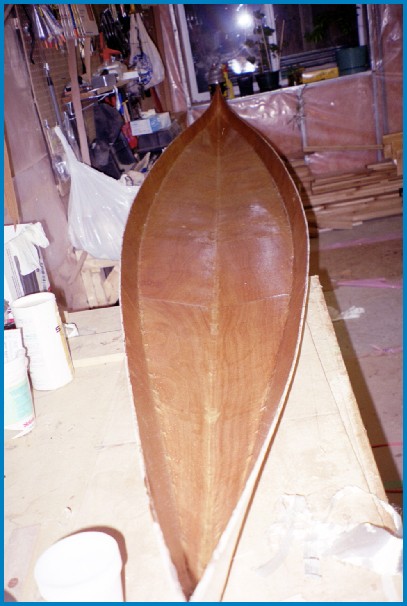
Here is a snapshot of the inside of the hull fibeglassed. you can
just see the second layer of fiberglass in the cockpit area.