Kayak Building Diary - Part I: Plotting and cutting Hull
Friday Nov 16
Received Epoxy and 5 sheets of 4mm okoume (BS1088) Plywood from Noah's
marine, and two rolls of fiberglass tape (which I decided I do not need
but will use anyways). This cost me (about $900 Canadian, I'll have to
wait for the visa bill). including $60 for shipping from Ontario to Calgary
AB.
Sunday Nov 18 - 1hr
Setup some out feed tables, and ripped the plywood to 33 inches, enough
room to plot out the panels for the Stitch and Glue version of Nick Shade's
Guillemot Kayak. After much deliberating I've decided to build this boat,
for which the design is available for free from the web. The plan is to
extend the boat a little 17" making it just over 18.5 ft long. This is
so I can use it for a bit of tripping. At 185lbs, I'm pushing the limits
for the guillemot's design weight.
I'm hoping the leftover 15 inches is enough to build another Hull for
a smaller Guillemot for my wife and or friends. I'm would like to put a
strip build deck on it. we will see...
Extending the boat is simply by moving the X coordinate over one inch
for every point in the table that lands on a 1ft boundary. The other points
are moved according to the percentage of a ft from the previous point to
land at 1 ft. (usually 1/2 an inch, for those at the 1/2ft point- I'll
try and remember to check what they actually are, I'll even see if Nick
will allow me to put up a new table for the longer Guillemot)
I am not a boat designer, I've no real Idea what this will do to the
handling characteristics of a boat. So use with caution, if it makes a
bad boat, don't blame me.
Tuesday Nov 20th 1.5hrs
Today I began 'cutting' the bevels to be used to join the sheets of plywood.
I managed to cut the bevel on one edge of all the plywood in an bit better
than an hour. I've set up the other side to cut the bevel on the second
side of two of the sheets.
The bevel is used to create a scarf joint. For my kayak, I'll need to
have a scarf joint on both sides of two of the sheets of plywood, on one
side of the two other full length sheets, and on one side of both of the
1/2 sheets. For me I noticed that one of the sheets had a pretty good gouge
in it to one end. I ensured this sheet did not get the bevel on both sides
as that would have left the gouge in the middle of my kayak. This way I'll
try and remember to put the gouge on the excess side of the plywood and
not have it in my boat.
This is done with a belt sander (alternately you could use a block plane).Apparently the ideal bevel for a scarf joint is a 8 to 1 angle cut. To
achieve this go borrow a belt sander from a friend (BTW Thanks Greg!).
lay the sheets out, in a stepped fashion at the ends, such that the run
on each step is 8x the thickness of the ply wood. For 4mm Plywood, the
magic number is of course 32mm (gotta love metric). The top piece of plywood
gets a line at the at 32 mm from the edge of the ply wood. Now wearing
both ear plugs and Eye protection fire up the belt sander and sand down
the bevels. Whilst doing this pay attention to keeping the line pattern
that is uncovered nice and strait, this should help ensure a good bevel.
Mine turned out okay, not perfect, I expect to get a bit extra line showing
where the planks are joined. This effect should be reduced due to using
the good plywood with the thick veneer. No change in wood type will occur
at the joint. This may be (or not) a concern if you use a plywood with
a thin veneer.
Depending on the design you choose to build, it may be better to rip
the plywood into thinner strips, and draw one panel per piece. I chose
to make a large sheet, draw all panels on it and cut it out. for the Guillemot
this should save a bit of wood due to the upturned ends. Just a thought
Wednesday Nov 21th 1.5hrs
- Finished cutting the bevels - 1/2 an hour
- Setup my work bench for building the Kayak on - 1 hr, including cleaningup the tools and floor a bit.
- laid out the plywood on the bench 10 mins or so.
Well got my first swear word out today... cutting the bevels. I could not
figure out why I was getting odd patterns in the bevels, it was not bad
just did not seem right. I kept at it, right on the corner of the wood
after a bit, I had a really bad angle going, it was not flat. Turns out
the belt sander is not completely flat at the end. I'm not talking about
the radius as it goes around the outer pulley. Rather the fact that there
are 3 pulleys in the system , the first one is smaller than the other two
making the end a pointer... Oh well, we'll see how it goes together.
The work bench makes use of the strong back build as per Ted Moores
book Canoe craft. (extreamly similar to the strong back found in found
in Kayak Craft), the "ribs" are left over pieces of cedar from my deck.
Thursday Nov 20th 1hr
I've glued the scarf joints to make one 'mega' sheet of plywood. Have to
yet to glue the second one. Wish I had done a better job with the scarf
cut. Oh well it went together. I had to put one sheet at a slight angel,
in an effort to make a better scarf joint. This was because of the deep
cut at one end of the sheets. Luckily the 1inch extra I allowed in the
over all thickness is enough (barely). I guess I should have gone back
and re did my scarf cuts. Oh well
Saturday Nov 24, 1/2 hr
Well got the next mega sheet of plywood gluing up, this one looks to be
making a better joint.
I've also done a bit of calculations, the 15' left to over is just enough
to get another Hull out of the plywood. I'm going to build it, and put
a striped deck on top. I'm almost more excited about that than the stitch
and glue kayak.... hmm maybe I'll do that one first, if it turns out I'd
have enough plywood for three hulls.If you are interested in the table
of offsets to make just the Hull you can find the table here
Saturday Nov 25, 3 hrs
Bought some tools:
- 72 inch strait edge -$21
- A 'Japanese' dual sided pull saw - $32.
- A mechanical pencil with the thick leads $3 (piece of crap lead fall out)
Well Today I had planned to get lots of work done on the kayak... not the
case. I did manage to scrape off the glue on the seams, that took about
20minutes. Some of the seams turned out well, however two if them are pretty
bad. They are not a flush joint, there will be a fair bit of veneer sanded
off, hope it does not effect the fairness, and leave to much of the epoxy
showing at the joint.
Anyways, I am have started the of plotting out the points for the panels,
This is going quite slow. I've run a strait base line, using a string just
above the board to transfer points down on the wood. Then the points are
joined using my brand new 72" strait edge. Additionally, I've managed to
get a vertical line for each of the columns in the table, and have plotted
the points on the first few lines.
Monday Nov 25, 1.25 hr
Today I plotted more points... I'm starting to think I'm some what dislexic.
especially converting decimal to English measurements, which after building
a canoe to the book "Canoe Craft" by Ted Moores, I read to the +/- values
(eg: 1/2 +, which is 9/16 , and 1/2- = 7/16). Anyways I'll have to recheck
all the points, I've started and found a few that were wrong, or off by
1/16th already. As they say: "Measure Twice cut once" and when the sheets
of ply are $55 a pop I'll even listen to them (who ever they are).
I've plotted the points for all the panels, including the deck, even
though I've kind of made up my mind that I might build three boats all
with stripped decks. But just in case I change my mind I've plotted the
deck and deck sides.
Oh I'd have saved some of a bit of grief today if I'd labeled each of
my vertical lines, I ended up off by 12 inches at the end of the boat and
had to move some lines back. At the time it kind of confused me as I suddenlyhad lines that were not where I thought the should
Oh I'd have saved some of a bit of grief today if I'd labeled each of
my vertical lines, I ended up off by 12 inches at the end of the boat and
had to move some lines back. At the time it kind of confused me as I suddenlyhad lines that were not where I thought the should be.
Wednesday Nov 27, 2 hrs
Today I played connect the dots. Using a extra piece of cedar planking
as a batten, with one side held at each point, I drew a line. It is a bit
tricky where the panels go from concave to convex angles, as you have to
hold it on both sides. I was able to get most of the dots connected on
my own, however at the ends of the bottom panel I got a helper to use the
pencil as I grunted the batten into shape. I could have used more flexible
batten I suppose...
It took quite a bit of time, During the bulk of the two hours, I only
drew the lines for the side and the bottom panels. I also got the first
two spacers plotted out and the lines drawn on the plywood.

Friday, 2.5 hrs
Spend about 1.5hrs drawing the lines for the deck and the Deck Side, Just
in case I do go for the full stitch and glue kayak. I want to do the deck
as a stripper, but I think it will be hard to get the curves right. So
I'll draw these out while I still have the strait line reference on the
board
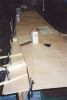
1hr: I also cut out the bottom panel, and planed down the one side...
Previous
Next