I beveled the edges for the bottom and side panels, then put a bit of a round on the inside corner. The rounding is a tip that I read some where off the net, it makes the panels not 'jump' out of alignment. The beveling worked well too, except do not bevel the ends of the side panels, the angel is so slight it just caused me grief. What happened was the holes I drilled on Saturday were about 1/4 of an inch form the edge, the bevel removed enough wood that the twists pulled through
I did manage to get the hull stitched up, The other thing that caused me a bit of grief were the ends, they were not to hard (I was prepared for them to be) However I did not started at one end, rather from a vertical line around 2 ft from one end. That was dumb, for some reason at the time I thought that thouse lines would be the same point. Of course that does not take into acount the curve the 'chine line' follows. Anyways, I ended up having my side panel shifted over by around 1/2 an inch or so. I recommendstarting from the stern of the boat, and working to the bow when makeing the holes. Oh well I had to cut the stern down a bit, and I have a hole at the bottom of the front. I intended to paint the hull anyways, so nothing lots of sanding and an end poor cant fix. ( I hope )
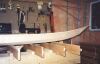
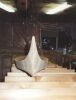
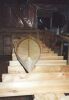
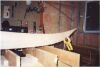
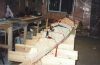
My pictures of the holes in the end did not turn out, to blury, but here are some pictures of the hull stiched together
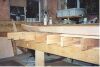
Well, previously I'd manually plotted two of the stations on wood and cutthem out. On the forth I was stuck at work, waiting for my wife, so I down loaded a CAD (computer aided design) program that was free off the net and plotted out my stations. This took maybe 45 minutes, mostly familiarizingmyself with the program. printing was somewhat annoying, and plotting the points I could not figure out a way to just enter the coordinates for each point, I had to use the mouse, and watch my pointer coordinates as it moved. I also often had an accuracy of +/- .1 inch, (due to my zoom scale?) used. Even so, this was faster than doing it by hand. I got half the stations done on the forth and 1/2 done on the next day. The half stations just fit onto a 11x17 piece of paper when the margins were reduced.
It took about 45minutes to transfer the points to a sheet of plywood. this was done quite simply. Working with one station at a time, I put holes through the paper into the the plywood at each point using finishing nails. Then remove the nails, flip the paper over, aligned the keel and top of the kayak points, and put put nails back through the holes that you just made on the other side. finally it is just a matter of connecting the dots, and cutting out the stations.
I then cut out the stations, using a jig saw, in total I'd guess this took me tow hours, I was not timing my self. The stations do not fit extreamly well, they seem a little big. I expect this is in part due to my +/-.1inch error when plotting, and errors in cutting. However, the primary cause is likely my beveling of the panels. This is not a big concern to me as I am intending to put a strip deck on the top, so I do not have deal with the problem of building the top piece and the bottom piece then fitting them together.
Well I did not do a lot of work on the kayak, did a lot of thinking though
As I said earlier, the stations did not seem to fit will in terms of size, also, the stitched form of the kayak did not seem to conform well to the shape of the stations. the Bow was close, the Stern needed to be forced into shape. I considered stapling the hull down (I intend to paint it anyways), however I eventually came up with sinching the hull to the station using ratcheting tie downs. This worked really well, I was concerned that the staples would not hold anyways, and something just seems wrong with putting holes in the hull, even though you know the epoxy will fill them.
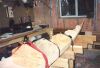
I have two types of ratcheting tie downs, on is a single piece, where the 'tether' is attached goes around what ever you are tieing down and comes back through. This worked really well. The second type is a two piece system, where a small 16' (or so) tether goes out an end in a hook, the second piece is a simple 12 ft tether, with hook on one end. This worked less well, but well enough. The hooks made it want to twist off the station. I already owned these, but I remember they were pretty cheap, $12 or so for 4 in a package at either Revy or Home Depot. The first type cost me $10 or so for the single piece.
So what did I spend so much time thinking about you ask... Well how the heck am I going to get the strip deck attached. In short I've decided to do the following:
I'm leaning towards the first method, as it seems to me it will build a deck that is guaranteed to fit, and the shear clamp will allow me something to glue down to. However there is a part of me crying out, Just build it the way normal people do (follow the instructions) however, in my opinion, a strip deck just looks so much better.
Once the deck is build it will have to be removed, and fiber glassed on the under side. Then put on and permanently attached.
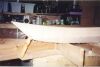
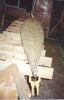
To put the bead down I rounded off a piece of scrap 4mm ply-wood, bout 1 inch on one side and 5/8ths on the other, and 4 inches long. This was then used to run the epoxy into the bead. I found it easier to use the wood at around 30 Degrees from the bead line. Other wise it tended to scrape most of the epoxy off. Once the bead was down, I took another long thin (about 1/16th of an inch), and 1 inch wide piece of wood, cut the end flat then used it to scrape off the excess epoxy that was squeezed out of the side of my fillet. That is the unwanted ridge (and bumps and stuff) that forms from the epoxy forced out between the fillet stick and the edge of the wood, not the wanted bead in the center off the stitched joint.
One other thing I did was run packing tape under the keel line at the ends of the kayak. This was to prevent the epoxy from running through the holes that resulted from me not being able to completely close off the ends of the kayak.
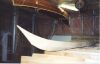
Here are some pictures of the glued hull