

More self made delays today, spent a fair bit of time thinking on how to do the cedar strip deck (not counted in the 3/4hr).
The majority of the time was spent working on the paper plots I had made of the spacer stations. I dug up my old French curve from my drafting class in university. With that I was smoothing out the tops of the station plots. These I will use to become my deck. I'll be taking these drawing to work and photocopying them. Then I'll use the photocopies to make 'bridges'onto which I will strip the deck. Hope they are fair enough, and that the limited number of stations do not cause me grief with an un-fair deck
I guess I spend 5 minutes or so taking out the spacer stations from the deck. These stations when I put them in were forcing the deck panels out, in fact I found out a week or so later that I had miss marked one of the shear lines by 5/ths of an inch (measures 5.7, instead of the 5.07 on the table) This point really pushed the deck out. When I removed the stations, the deck held its shape really well.
TIP
- turned out I had enough to make two full stations. While taping the
two halves together I noticed that the masking tap I was using made th
edges a lot stiffer, and less prone to folding. You can see the lines easily
under the masking tape. So the tip is to run tape over the lines prior
to cutting out the stations. This will produce stations templates with
a taped edge, which will make tracing the stations easier.
I'll be going back and putting tape around the Edges now and have to re-cut the station again. I don't feel strait paper templates will be good enough to use without gluing them down to the wood. I have made 1/2 station templates, and have no quick stick type glue anyways. Opinion Actually I also prefer to use the 1/2 station template anyways, it produces a more symmetrical station, by removing any +/- cut error when cutting out the lines for each side.
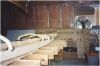
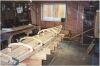
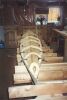
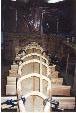
So why bridges, instead of full stations you ask. Well you use a lot less wood, but the main reason is that gives me something to clamp to. I should be able to build staples using my clamps. Most of my clamps are 2", thus my bridges are 1.5" thick. The wood is scrap 15/16" OSB taken from the garbage bin of a construction site. This gives lots of bulk to holds its shape.
Well, now I've thought of something that gives me pause. I'm building the deck in place on the hull. The hull is not fiber glassed, and the deck will put a fair bit of weight on it. Hmm, I think I'll have to support the hull fairly well, so it may in turn support the deck without grief. Normally I'd just fiber glass the hull, however it is to cold out to open the window to vent the fumes.
Argh, found an error in one of my station plots, This has deformed my hull a bit. I fixed it on the plot, and on the bridge, looks like I'll have to a bit of grunting when I put the hull and the deck together in the future.
It sure seemed like I spend a lot of the day using the wood rasp. I was beveling the edges of the bridges so they would sit nicely in the hull. It was not until I'd packed up for the day, that I finally got a hold of my buddy who has my bench top belt sander. I'll make good use of that tomorrow
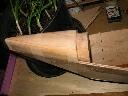
I also got some work done on the decks ends. What I am thinking of doing at the ends of the deck is that, I will use a thick piece of cedar to build up the ends to the original plans. I am going to put a lip, to but the planks into, this should give me a nice solid, and easy to use planking procedure. I have the stern deck piece mostly done, I just have put put the lip in. The Bow I've started to shape, It is giving me a bit more grief. The 2x4 is not thick enough, I'll have to join two of them together. Luckily the buddy who had borrowed my belt sander has a plainer/jointer, I should be able to get a nice piece some how.
making the deck, procedure
spent a fair bit of time cursing today (well in my head anyways). I did manage to finish off the stern deck end, that was just puttin the lip down to bring my strips into.
shaping the bow deck end gave me alot of grief, well I guess I gave myself the trouble, but anyways. due to the rise in the bow I need to stack two 2x4s to get enought thickness. That would have been fine, but I miss cut my upper piece, the old joke 'cut the piece twice and it was still two small' jumps to mind. That was my last piece of decent 2x4 I had. I did end up pulling one that I had temporarily tacked to my strong back, and used it. Took me along time to find it though. The bottom half of the deck end I did not do as good a job as I would have liked getting it to sit into the hull. It is loose, oh well, nothing a good solid end pour will not hold in place.
I got the two pieces of wood that make up the one end glued to together. I had a bit of extra epoxy, so I mixed up some sawdust, flipped the kayak over(the bottom of the hull is now up), and filled in the seams along the fillets. I had just enough epoxy
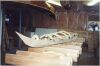
Here is a picture of the stern deck end taped into place:
I really should be Christmas shopping ....
Today was yet another puttering around day. I really need to get some wood (poplar?) so I can make some feature strips. I taped the edges of the hull to prevent gluing the deck to the hull while I'm planking it.
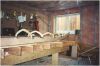
I screwed some old scrap strips to the inside of the deck molds (the briges) so they will hold in place. Two are on the insiced along each side of the hull, and one along the top on the ouside of the bridges. I'll be removeing the outside one as I plank the deck. note: I treid holding these on with staples, but it was not enough I ended up pre-drilling holes then screwing themdown.


note: actually I ended up removing the outside braces, and glueing them one the inside.